Graphics
Jon Phillips, December 2007
Image reigns supreme. From the thousands of films churned out each year from Nollywood, to the persistent recording of images by security cameras in London to the scaling of windows on your desktop computer, you are already a pixel pusher. But, how can you reign supreme over images? How can you become an active participant in the creation of graphics and move beyond passive consumption. While the distinction between amateur and professional is erased in the Youtube-record-a-video-get-rich-generation, the focus upon high-quality content controlling tools is key. What is the point of mastering verion 3.5 of Killer Graphics App 97's fuzz filter [1] if you don't have a use, or you have become locked into a niche application that costs 2000 Euros for each new version? The focus of this chapter is about exploring free and open source tools that empower you to do what you want to say and if the tools aren't working out, you are allowed to change them from the inside-out! The major tools in this chapter to be discussed are bitmap editor Gimp, vector drawing tool Inkscape, 3d graphics with Blender, and algorithmic graphics creation with Processing [2]. By the way, these tools are free! They have huge constructive communities around them waiting to help you with your tasks, adding new features and supporting vibrant actively producing pixel pushers.
In working with any graphics application, it is important to understand the difference between vector and pixel graphics. Vector graphics describe the use of geometrical primitives such as points, lines, Bezier curves, and polygons to represent images in computer graphics [3]. It is used in contrast with the term raster graphics (bitmap graphics), which is the representation of images as a collection of pixels (dots). Vector graphics are math equations to define curves, generally have a smaller file size than raster graphics and also, can be scaled from tiny to massively huge billboards with no loss in quality. The letterforms for these words I'm typing are vector graphics. Bitmaps on the other-hand, are the types of images that a camera outputs, for example. Maybe your camera is a 5-megapixel camera, meaning it can record 5 million pixels per image. With bitmap graphics the more data about an image, then generally the better quality image, and thus a larger file size.
Gimp is one of the oldest free and open source applications. It is now 10 years old and is on par with major closed-source [4] applications. Gimp is primarily a tool you can use to edit all aspects of a bitmap image, from color retouching of photos, to painting on a canvas to fixing blemishes on a face, Gimp is chock full of tools. Its vector-based sibling is Inkscape, an Open Source drawing tool. With it you can make complex typography, make huge billboards, draw architectural plans and make lovely charts. This powerful tool implements the World Wide Web consortium's Scalable Vector Graphics specification (SVG) and points out another strength of Open Source graphics tools in supporting free and open standards that won't just vanish because a company closes shop, or locks down a format under proprietary patents.
Another important concept for graphics is the difference between two (2D) and three-dimensions (3D). Most graphics applications, including Gimp and Inkscape, are two-dimensional, meaning they deal with height and width of graphics, also called X and Y coordinates. Think of 2D graphics as a piece of paper. 3D graphics, like those operated on by the free software editor, Blender, add depth (Z-axis) to 2D graphics. This is what you see in the famous Pixar movies like Toy Story and Cars [5].
These typical 3D animations also add a fourth dimension (4D), time. While Blender does handle the fourth dimension by allowing 3D creators to animate, for these chapters, the concept of 4D also includes the concept of graphics through time and interactivity. When Casey Reas and Ben Fry developed Processing, a simple Java-based language and runtime for creating generative graphics [6], the tools for creating graphics primarily relied upon manual creation with Gimp and Inkscape, or more sophisticated knowledge of graphics programming in C/C++. Processing lowered the barriers for participation in creating interested graphics from code, and also allowed for these graphics to take on a life of their own through user interaction. It should also be noted that Inkscape, Gimp and Blender all offer forms of scripting and automation as well to enable creators to be extended quickly. The main difference between these three apps and Processing, is that Processing generates standalone applications which can be run anywhere. This is great for artists who are making interactive installations, but way too much manual controls for simple photo retouching.
In addition to these great free and open source tools that exist, there are projects as well, which focus on the community of graphics creation and on connecting together graphics applications into a coherently focused suite. The Open Clip Art Library encourages the upload and remix of public domain vector graphics under the guise of “clip art” and the Open Font Library goal is to build the world's largest free and open collection of fonts [7]. The Open Clip Art Library has approximately 15,000 pieces of high quality public domain clip art, meaning anyone can do anything they want with these resources. The Open Font Library is still a fairly new project with ~40 high quality fonts that are either in the public domain or under the new SIL Open Font License [8]. The most notable font on the system is by famed kottke.org blogger, Jason Kottke. He created the super-popular font Silkscreen, a small bitmap-looking font used everywhere on the web. He recently licensed it under the Open Font License and uploaded it to the collection, signally clearly to other font creators that they can build upon it and make it better.
While all these projects exist in the free and open source software universe, the projects did not talk very much until two key projects developed. The first is the Create Project, whose goal is to provide a third-party space for creation applications to work together on standards, shared resources (palettes, brushes, patterns, keyboard mappings), and to encourage inter-project communication [9]. The other key development is the annual Libre Graphics Meeting [10] which is the major event where artists and developers come together to work on making free and open source tools better, seeing what is possible by artists, and massive amounts of cross-pollination to create the future for graphics pixel pushers.
The major difference to closed source proprietary drawing apps is that you can't reign supreme over images. You can't become a true pixel pusher. You can only be the pixel pusher that someone else wants you to be. By using Gimp, Inkscape, Blender, Processing or one of the many other free and open source applications, you can dig deep into the code and communities of these projects. You can even shape the direction of these projects by joining in the discussions, filing bugs about problems with the tools, and showing off how much you reign supreme over images pixel pusher.
Notes
[1] Please note, this is vast satire over learning tools rather than having a reason to use them. Also, please note, this should be called the cheese filter.
[2] See http://gimp.org, http://inkscape.org, http://blender.org, http://processing.org
[3] My Vector Graphics definition is based on http://www.webopedia.com/TERM/v/vector_graphics.html because of the object-oriented reference.
[4] I dare not link to the various Adobe applications you all know I'm referring to: Adobe Photoshop for the GIMP, Adobe Illustrator for Inkscape
[5] The irony of this is that 3D graphics are rendered back into a 2D representation onto a screen, or in a movie theater.
[7] See http://openclipart.org and http://openfontlibrary.org
[8] See http://sil.org/openfontlicense (CHECK THIS URL)
[9] See http://create.freedesktop.org
[10] See http://libregraphicsmeeting.org
Blender: Working with 3D
Sumit Sarkar, May 2009
Once upon a time to work with 3d software you'd need a small fortune to get you started – a few thousand Euros for the software, and a few more to partake in a premium rate course or two to learn the basics. Or you could save your pennies and buy a mute tutorial book, which would invariably go out of date as newer versions of your program would surface, and keyboard short cuts, terminology and layout would change.
Now the world of 3D computer graphics has opened up and its anyone's game. Blender[1] potentially replaces the industry standards of Maya, Cinema4D and 3DS Max, happily quelling the age old dilemma of 'which 3D program is best / should I fork out on?' ('try Blender, its free and its great'). Your premium rate teacher is replaced by the hoards of helpful souls wandering Blender forums, waiting and eager to help, and to get you started you can search for the array of video tutorials on YouTube and beyond, lovingly created to make learning easy.
In the year and a half I have been learning and working with Blender, several new versions have already been programmed, further bridging the gap between open source and industry standard. And the world's knowledge of the program has equivalently improved. Ask a question and it is answered often in minutes. If the answer isn't known, you can bet your bottom dollar that the collective will be working out the answer. As such, any 3D task I've wanted to do, I've been able to.
Blender for Sculpture
The main reason for my foray into 3D work came from the need to create a series of sculptures, digitally designed, and physically made via rapid prototyping (RP) techniques[2].
I had initially looked into clay work, but I found the processes cumbersome, and nearly impossible to realise the detail, complexity and finish I was after. Thus the solution seemed to be to go digital with the 3D work, in the same way I moved away from analogue painting and design to digital with my 2D artwork, needing techniques infinitely more speedy, controllable and precise.
To be an artist, you now no longer need a studio space, expensive materials, tools and equipment - just a computer and an internet connection.
Work Flow
Your method of working will be down to you - indeed even for simple modelling, there are many ways to skin your cat. Some will want to prepare storyboards and sketches before embarking on a sculpture or animation, others dive in and follow trains of thought. Either way, it is the idea that drives the work, and that can come at any point in your project.
Interface
Many comment on the unusual interface of Blender, initially most noticeably in the way it uses a left click where most programs use a right. While you could change the settings so it is the opposite, I would recommend leaving it as is – once you get used to Blender's interface, it really feels very logical and intuitive. Indeed Blender has the most malleable interface of any program I have used – every window can be set to display the toolbar, panel or working area of your choice and you can even customise the overall look of the interface changing colours, sizing and fonts. Once you get used to Blender, you'll soon be wishing other programs followed its user friendly interface logic.
Edit Mode and Object Mode
I would highly recommend Apollos' finite Blender Basics video tutorials [3] as your first point of call. I have found following video tutorials the easiest and most successful way of learning. Watch, copy, rewind, repeat, master.
These will give you an insight into the two main modes you will use, Object and Edit Mode. Object mode allows you to work with all the objects in your scene, including such things as lamps and cameras. Click on an object and tab into Edit Mode and you'll then be able to work precisely on the individual object. There are too many vital Blender processes and their keyboard short cuts for it to be relevant to list just a few here – spend an hour or so with Apollos' tutorials and you'll know them all.
Having learnt the basics of Blender's Edit and Object Mode, you could pretty much make anything. If a sculpture can be seen as being a collection of co-ordinates that define its form, once you know how to create, move and join vertices (the individual points that make up your model), the only tricky bit becomes knowing what to make. Certainly patience and commitment are key attributes for any sculptor, digital or otherwise.
Modifiers are an important tool for modelling, and are equivalent to filters or effects in a 2D art application. Adding a modifier to an object applies that effect to the object, and can be removed, made invisible and modified without affecting the original mesh (the net form of all your connected vertices), You can add multiple modifiers to any given object. In many cases you will not need to apply your modifier at all but if you do make sure you do not apply it too soon, as this can result in meshes with a high number of vertices (which will push the power of your pc) and once applied you can't go back. For example adding a Subsurf modifier will make your object appear smooth from the few vertices of your mesh – apply it and it will make the modifier 'real', i.e. create enough vertices to ensure that smoothness (I always save my files with a different name every time I make a pivotal change so that there is 'going back').
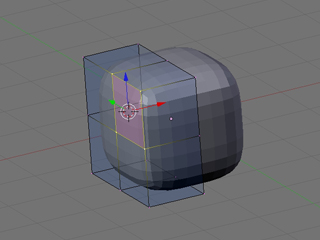
A popular method for modelling is what is known as box modelling. Starting with Blender's default cube, subdividing it, adding a mirror modifier and a subsurf modifier, has you very quickly creating complete forms (subdividing adds extra vertices to your mesh, a mirror modifier means whatever you do on the left side is mirrored on the right, and the subsurf modifier adds extra subdivisions to each surface, making a few simple vertices appear curved and smooth.).
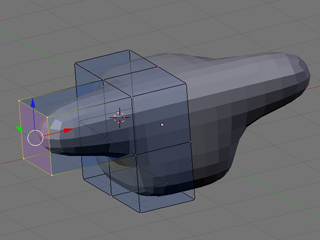
Add to this the extrusion (see image below) of vertices and faces (a face is made up of either 3 or 4 vertices) and you could easily make a humanoid form in 15 steps. This is the very essence of 3D modelling – starting with a simple form, adding more vertices to work with (e.g. by subdividing and extruding), and fine tuning.
Subsurf and Mirror modifier
Extruding a face
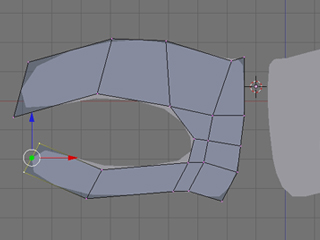
Alternatively, you can start your model from scratch, which is often the technique used for making human faces, or objects that aren't easily simplified into geometric shapes. Starting with a vertex, edge or face, extrude and reposition away until your form starts to take shape. Many people find it useful to use a background image as reference.
Modelling with extrusions
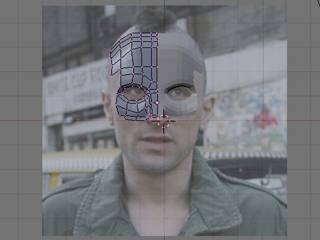
Using a background image as a guide
Sculpt Mode
Once you have your basic form, switch to Sculpt Mode for a more organic shaping of your mesh. All physical sculptural techniques exist here: You can Draw (which adds or 'rubs out'), Smooth, Pinch, Inflate, Grab, Layer and Flatten, all the tasks you could do with clay, without any of the imprecision or mess. You may need to subdivide an area so you can add further sculptural detail. Theoretically you could start with a cube, subdivide it to Hell, and create your model purely by sculpting it.
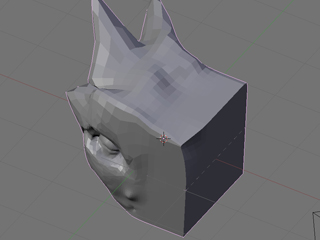
Sculpt Mode
It is also worthy of note that working in a virtual 3D environment that is essentially 2D from our physical point of view, it takes a bit of time to get used to the way the 3rd Dimension works, i.e. what is in / out, left / right being relative to the angle at which you're viewing the scene. With a bit of use, this quickly becomes instinctive.
Physical Output
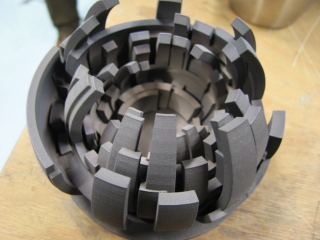
As for outputting to physical form, Blender takes pride in its compatibility, so exporting in the correct format for rapid prototyping is a one click operation. MeshLab[4], another open source program, is also a useful tool for working with your .stl's (.stl is the file format commonly used for RP); finishing your meshes for output, sizing your object for the real world, checking for and cleaning up errors and generally seeing what your RP client will see.
One big issue I found when modelling for output was the trickiness in joining two meshes together. For example, if I wanted to merge a cone with a cube, (or a more complicated example being a hand with a sword), it is not merely enough to join the two objects, as all overlapping vertices would remain. For RP, the model needs to be one continuous outside net. Blender's Boolean[5] operation is intended for this, though is not quite yet up to scratch, especially when joining complex meshes together. As such I spent ages manually stitching overlapping meshes together, removing 'inside' vertices, when this could have been done in seconds by your RP client. Don't believe them if they say it will take many design hours to do this - it was only the very honest company I ended up working with that told me it is a one click, two second operation on their industry standard stl programs (which I'm sure MeshLab and Blender will be able to do before long).
I needed to work with a rapid prototyping company for my sculptures, though this is a very expensive process, the industry catering as it does for industry. However open source solutions are on the up, and that must surely be my next project. RepRap[6] and Fab@Home[7] are two such open source RP projects that are in development, designing machines so they can be made at home, and in case of the RepRap will even be able to self replicate. For the time being you can find your local Fab Lab[8] and use their machinery at relatively low costs, and even free in some cases. Manchester will soon see the UK's first Fab Lab.
It is encouraging that such things are becoming more affordable, and I've heard of 3D printers being introduced to schools and universities. Given a few years, I'm sure we'll all be able to create sculptures on our computers and 'print' them on our desk top 3D printer.
Screenshot of Blender Sculpt
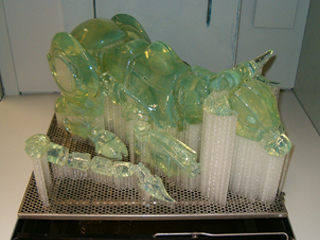
Photo of Rapid Prototyped model
Blender for Animation
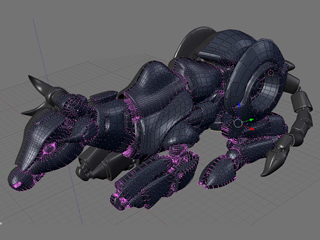
Another main area in which I've used Blender to make artwork is for a series of animations. Modelling for animation is much the same as for sculpture with the main difference being the need to use as few vertices as possible to speed up rendering time. Working with quadrilateral faces (a face made up of 4 vertices) and avoiding triangles makes life easier (you'll see), and it soon becomes like a game, trying to make your model with as few vertices and triangles as possible.
So far you'll have modelled using three dimensions, X, Y and Z. Animation brings you to the fourth dimension: time. Place a ball at a certain point in your scene, and at a certain point on the timeline (the measure of time for your scene), say 0 seconds, set a key (a marker of an object in time), then move the ball's location and move forward in the timeline, say 4 seconds, set another key, and hey presto, you've animated. The ball will move between those two co-ordinates over 4 seconds.
Learning these basics means you can potentially make any animation you can conceive. Seemingly complicated scenes are purely down to detail and precision, i.e. the movement of a hand from A to B is one action, the movement of a hand with all of its fingers moving realistically is just many more equivalent actions for each section of each finger moving between two or more co-ordinates. Certainly patience and commitment are key attributes for any animator, digital or otherwise.
Get more into Blender use and you'll soon be rigging your character with sets of actions and constraints, so that by moving one object, the whole hand will clench into a fist, or spread its fingers.
Blender's physics engine is another gratifying and hugely useful tool for creating dynamic animations. A few clicks here and a value entered there, and the hair and clothes of your character will react to gravity, wind and movement, and bellies will bounce. Google or YouTube-search softbody and cloth, and you're really half way there.
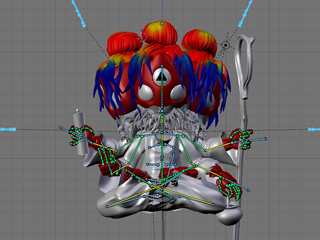
Rigging model for animation
Render of animation
Blender Live
I've also used Blender for live work, that is, creating 3D artwork at clubs or art events [9]. With a computer and a projector and a confident knowledge of all of the above, it is more than possible to create a virtual sculpture in a few hours. It is captivating for an audience to see a blank 'canvas' evolve into a 3D form, more so than the 2D equivalent live work I used to do, and the ease of Blender's interface makes the process fluid and highly watchable.
Rendering
Finally, adding lighting, colour and texture to your scenes is the fun part, and again the only limits to what can be achieved are those of your imagination.
In the vein of such CGI films as The Incredibles and Monsters Inc, there are a growing number of films made entirely in Blender [10], most famously Elephants Dream, proving Blender (that's you), can do anything the industry standards can. This bodes interesting questions for the future – as personal computers get more powerful, and newer versions of Blender and other open source programs are released year after year, given ten, and a great idea, aren't we all then on the same playing field as Hollywood and multi million Euro budgets?

Still from Elephants Dream
Notes
[1] http://www.blender.org/
[2] http://en.wikipedia.org/wiki/Rapid_prototyping
[3] http://blenderunderground.com/2007/07/18/blender-basics-part-1-video-tut...
[4] http://meshlab.sourceforge.net/
[5] Boolean operations are AND, OR or NOT, or in Blender terms, Union, Intersect and Difference, i.e. You can join two objects as one, work out the area they intersect, or the area they don't, very useful processes in Rapid Prototyping
[6] http://reprap.org/bin/view/Main/WebHome
[7] http://www.fabathome.org/
[8] The Fab Lab program started at MIT's Center for Bits and Atoms (CBA) and spread from inner-city Boston to rural India, from South Africa to the North of Norway. Fab Labs provide widespread access to modern means for invention, and share core capabilities, so that people and projects can be shared across them. http://en.wikipedia.org/wiki/Fab_lab
[9] Live 3D work recorded http://www.youtube.com/kriksix
[10] It's open source so it's all free. Download at http://www.blender.org/features-gallery/movies/
Images
[0-9] by the author
[10] (c) copyright 2006, Blender Foundation, Netherlands Media Art Institute, http://www.elephantsdream.org
Working with graphics: Processing
Olivier Laruelle, September 2007
You might have come across the 'made with Processing' hyperlink on the internet or heard of Processing before. Over the past six years it has become a real phenomenon, allowing creative minds to access the digital world. Based on a rather simple syntax and minimal interface, Processing smoothly drives beginners into the scary world of programming.
This article is not a tutorial, but rather an attempt to give you a global idea of what the programming environment is, looks like and why it was created. Should you decide it is the tool you need, this article will hopefully provide enough pointers to online and offline resources to get you started on the right track.
What is Processing?
Processing was initiated by Benjamin Fry [1] and Casey Reas [2] In Fall 2001, formerly of the Aesthetics and Computation Group [3] at the MIT Media Lab [4] . We can see it as the follow up of Design By Numbers [5], created by John Maeda [6], a programming environment strongly oriented at beginners. It is an open source project free to download and free to use, with already a large community around it.
What and who was it designed for ?
As the Processing web site mentions: “Processing is an open source programming language and environment for people who want to program images, animation, and interactions. It is used by students, artists, designers, researchers, and hobbyists for learning, prototyping, and production. It is created to teach fundamentals of computer programming within a visual context and to serve as a software sketchbook and professional production tool. Processing is developed by artists and designers as an alternative to proprietary software tools in the same domain.” [8]
Those picking it up for the first time will find lots of very well written and archived code samples, a large amount of information on the internet and answers to question on the Processing forum [9]. The people behind Processing [10] have made huge efforts in helping the community to grow and learn. For instance by illustrating the language reference with clear snippets of code. Thus helping to grasp basic concepts little by little, i.e. image, pixel, array, mouse events, primitive shape drawing etc.
For the more international learner you are pretty sure to find a reference you will understand as volunteers joined forces and translated the reference into 8 different languages. Even if Processing was aimed at beginners, its versatility and ease of development still is relevant to anyone wanting to write creative software pieces.
What have people done with it ?
It is impossible to mention in a short article all the excellent work that has been produced in the past years. Processing has a wide range of possible applications such as data visualisation, generative drawing, print based design, video production, tangible installations etc... Following are some of the most inspirational work made with Processing.
Data visualisation
“We feel fine” [11] - An exploration of human emotion, in six movements - by Jonathan Harris and Sep Kamvar is an impressive web based example of what can be achieved. Processing was used as a creative front end for a database that was constantly fed with comments left by various users on the internet about how they emotionally felt. Based on particle looking interfaces, it's a delight to browse through all the snippets that people left on the internet without thinking that one day it would be collected by an artist, in the look of emotions.
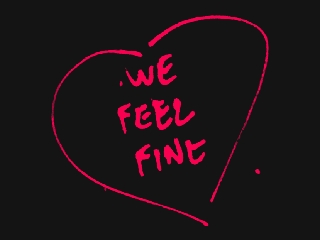
We Feel Fine logo
Artist Aaron Koblin, wondered what it would be like to see one day of aerial traffic over northern America. He collected enough data and used Processing to generate a video revealing a day of aerial traffic in America [12].
If data visualisation is an area that interests you, http://infosthetics.com/ hosts much more examples. Note that this is not a Processing only focused web site.
Generative drawing
A popular practice within the Processing community is to draw in an algorithmic manner 2d and 3d graphics on screen.
And so does American programmer/artist Jared Tarbell. He creates delightful “paintings” based on pseudo naturalistic behavioural systems. For example, Bubble Chamber and other pieces can be seen on his web site [13]. Exquisite 3d work such as Marius Watz's [14] illumination or Karsten Schmidt's “vox scape” and its intricate 3d mesh fantasy world [15] demonstrates the level of work that has been recently produced.
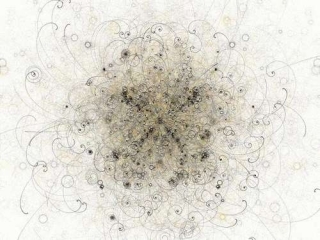
Bubble chamber by Jared Tarbell
Obviously generative graphics aren't bound to stay within the memory of your computer or on your retina imprint. They can be transposed to other media such as print - like for instance the Lovebytes 2007 generative ident [16]. 3d physical models can be made using rapid prototyping and obviously video can be composited using processing generated imagery such as “Nike One” by Motion Theory [17].

Illuminations 01 by Marius Watz
Generated art forms can also become reactive: to sound like, the beautiful and very popular Magnetosphere [18] iTunes audio visualiser created by Robert Hodgin [19], or in reverse when forms generate sound as in Amit Pitaru's sonic wire sculptor [20]. Processing doesn't need much extra to be used as part of a physical composition. One easy way to achieve physical interactions with Processing is through camera assisted computer vision. Processing (windows and mac version) is able to read video streams in a very simple fashion. Thus enabling artists to write code for detecting presence, motion, ambient colours etc... Shadow monster [21] by Philip Worthington is a good example. He revisited the shadow puppet theatre mechanic, augmenting it with digital shouting monsters. It is immediate, fun, accessible and self explanatory.
Voxscape3 by Karsten Schmidt
Cameras, keyboards, mouse or sound inputs are not the only interfaces to physically interact with computers. Sensors of all types are also available. Be aware that you will probably need to work in parallel with other programming environments and hardware such as Arduino or Wiring. Physical computing with Processing isn't the focus of this article but, should you be interested in it, you can find references at the end to use as a starting point.
Object #1 by Marius Watz
The environment
Where to start ?
The Processing download page [22] is where it all starts. There you can find the version of Processing corresponding to your operating system. Once downloaded, decompress the file anywhere on your hard drive and open the processing application. It is now ready to run.
Before getting stuck into the code and making things work, it might be useful to take a step back and have a look at what metaphors are used throughout the environment, but also how it basically works.
All in all, the processing environment is a group of 3 things : the IDE (integrated development environment) [23] the core library code, and the external libraries.
The IDE : what does it look like ?
To make it simple, the IDE is what you first see when you open Processing. Its the area where you write and edit your code, but also contains the buttons and the menus you'll be using. The first thing you see when starting Processing is a blank text editor. This is where to write code that will make beautiful things happen.
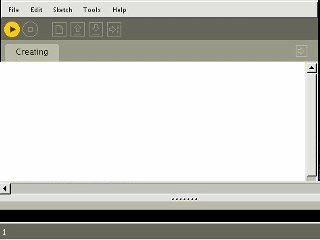
The Processing IDE
At the top are a series of buttons. From left to right : run, stop, new, open, save, export. I think their labels are pretty self explanatory in defining their actions. In addition more features are accessible through contextual menus available at the very top. namely : file, edit, sketch, tools and help.
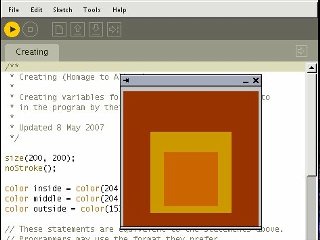
The Processing IDE
Sketches and sketchbook
The sketchbook metaphor Processing uses refers to a way of organising programs. A Processing program is a sketch. The application acts like a sketchbook from where you choose or create new sketches. It also comes with its own sketch examples. Reading and running them is a great starting point for becoming familiar with the environment and having a first stab at the language. Just select File > Sketchbook > examples > choose the category you're interested in > a sketch. Then press the 'Run' button. Repeat at will.
Tabs
Code can be split into several files to make it easier to maintain. Tabbing enables you to have all of these files open at the same time, making development quicker than if you had to close and open code sections each time. To do so, you will see a button on the top right. It allows you to create and rename or hide tabs. You can then copy paste them from one project to the other if needed.
Now that you know where to write the code, lets see what the code looks like.
Introduction to the basics
The Processing syntax was made to be easy and flexible to write with while keeping intact the main programming structural logic. This is obviously where it takes an interesting educational dimension. And to get quick visual feedback of your code is another motivational boost to experiment more and learn by the same occasion. Of course it takes a little effort to get into it, but the environment will give you enough freedom to smoothly sail along without pulling your hair every five minutes.
To give you an overview of what Processing code is like, we will go through some of the basic concepts of the language.
Setup and draw
First of all when you start writing your code you need to mention what will be the window display size. So how do we set up our favourite playground boundaries? By using the function setup() ! [24]
void setup(){
size(800, 600);
background(0);
}
If you run the above code it will create a window 800 pixels wide and 600 pixels height with a black background [25]. Processing always calls setup() first and looks at what it contains. It is usually used to invoke global commands relative to the sketch. Like the size, the frame rate, the rendering mode etc...
But drawing an empty window isn't really that exciting right? Where is the action? We want more than creating a window... we want to draw things into that window. How do we do that? Using draw() ! [26]
Add this to your sketch after previous code :
void draw(){
fill(255);
rect(350, 250, 100, 100);
}
And if you run this again you will see a white rectangle drawn in the middle of the screen on a black background. This is how to draw things. Unlike software like Flash or Director, Processing has no timeline, instead draw is constantly called at a regular time interval. So to animate things, you will have to calculate coordinates of your graphic elements from one frame to the other.
To place and draw graphics within the window, Processing uses the Cartesian coordinate system [27]. Like Flash the widow display has its origin at the top left corner. The 'x' being the horizontal axis and 'y' the vertical. So, the further right in your window, the higher the 'x' value, and the lower you are in your window, the higher the 'y' value. This obviously differs from the normal mathematical system with the origin placed at the bottom left of any 'graph'.
So as long as you set things in setup() and draw things in draw() you shouldn't have any problem. Check the reference [28] to learn how to use the syntax, and then check the extended references [29] for more exciting possibilities. Many shapes can be drawn, an infinite number of colour combinations can be used and plenty of animations awaiting to be created.
Note : Processing doesn't limit you to writing procedural code [56]. If you have Object oriented programming knowledge you can apply it too [30].
Inputs and Outputs
Common Inputs
Processing allows easy access to the common inputs a computer provides. You can capture the mouse coordinate, listen to what key has been pressed, or get the current system time.
File input
You are obviously not limited to drawing primitive shapes in Processing, you can also import all sorts graphics to play with. Processing will look into the data directory of your sketch for anything you want to import. Most bitmap image formats can be read but also SVG vector graphics. You can read video connecting through camera feeds or Quicktime files. It is very easy to read, write and analyse sound data using external libraries such as Sonia, minim or Ess. You can naturally also open and read the content of text or xml files [38]. Finally Processing has its own way of handling fonts, you just need to convert any true type fonts to bitmap versions font before you can use them in your sketch. This is doable manually (Tools>Create Font...) or dynamically using createFont().
Connectivity
The Network library provides the possibility of establishing connections to a network [28]. You can handily use the network connections and OSC to communicate with other applications. Another way to communicate with your program is by listening to the serial port activity (or i/o), perfect solution for connecting to physical interfaces like Arduino or wiring [39]!
Outputs
You can export the result of your computation to many different file formats. The more obvious being exporting an image of what is drawn in the display window using saveFrame() you can also export raw Quicktime for anything in motion (note : not on linux). For printing purposes it is possible to export as .pdf , Svg (proSVG library) or Postscript (SimplePostScript ), Collada for 3D or .wav for sound.
Export
With the processing beta version came the possibility to export applications ( File > export ) application. This will create 3 different types of executable file, one for each operating system, Osx, Windows, Linux. You won't need processing to run those files, they'll be standalone. It is also possible to export an applet to run in a web browser, or finally the present mode (Sketch > Present ) straight from the IDE.
The Present mode is particularly interesting when you want to cover the entire screen with your application. It won't change your screen resolution but the area not covered by your sketch will be filled with black.
Renderers
Another thing that might be worth mentioning at this stage is the different renderers you can use to display your sketches. You can do this by defining an extra variable in the size() command. Available renderers are :
By default, if you don't mention anything Processing will use JAVA2D, good for drawing and web but can be a bit slow. Unleash P3D (JAVA3D) ( size(800, 600, P3D) )and you can exploit its great functionality for drawing in 3d and making things portable onto the web. Faster? Defining OPENGL uses jogl a java bindings for OpenGL API. Very Fast, depending on your graphic card, but not easily portable to the web. OpenGL is almost another topic in itself as you can invoke OpenGL commands from within Processing, hence accessing another programming language. There are numerous posts on the Processing forum on how to hack around Opengl in Processing. Finally you can use PDF to export what the program draws to a pdf file.
Note : More information can be found on the size() reference page.
Now that we have been around the most important functional aspect of the IDE and have an idea of what Processing syntax looks like. The last principal aspect we need to understand is what Processing is doing when we run our beautiful code.
Core
Processing is written in Java and although it has its own syntax, everything written in Processing is converted back into “pure” Java before being compiled (run). “Distinctions between Processing and Java are the Processing graphics library and a simplified programming style that doesn't require users to understand more advanced concepts like classes, objects, or animation and double-buffering (while still making them accessible for advanced users). Such technical details must be specifically programmed in Java, but are integrated into Processing, making programs shorter and easier to read.” [31]
Processing is autonomous. It is shipped with jikes [32], an open source Java compiler. So there is no need to install Java to make it work. Nevertheless you will need Java Runtime Environment installed if you want to view your applets running in your very own browser [33].
One advantage of Java is its Cross platform compatibility. It will run on most operating systems. On the other hand Java can be slow compared to some programming languages such as C or C++. But in the context of a teaching software it makes sense to choose ease of use against speed.
Being based on Java also means you have access to the numerous great libraries the language offers. If you can't do what you want using Processing syntax there is probably the answer in the wide world of Java. If you wanted, you could even write Java code into Processing, but that may be the time for you to change IDE (to something like Eclipse [34]) and then use the Processing core as a library.
As it is an open source software development, you can have a look, download and play with the full Processing core code from the development site [35]. On the same web site, you will find lots of useful information on how to help develop Processing.
Libraries
Libraries are add-on code to the Processing core that allow you to extend the capabilities of the language. Some of them are bundled with Processing and so are available to use from when you download the main application. The other are user contributed libraries listed on the Processing site and maintained by their creator. For instance the popular Sonia library by Amit Pitaru allows you to access advanced audio capabilities like doing real time frequency analysis (FFT) and write wav from samples etc. MaxLink [36] Enables communication between Processing and Max/MSP and to name another one JMyron [37] by Josh Nimoy allows you to do advanced motion tracking using a web cam. One's answer to a technical need can then be shared with the rest of the community, resulting in a constantly growing list of libraries [38].
Processing sister projects.
There are 2 obvious ways of getting Processing to communicate with other devices than your computer. Writing programs for your mobile, or exploring the world of physical computing using Arduino or Wiring.
Mobiles: You can port your Processing applications to Java enabled mobile devices using Processing Mobile. There is a separated web site devoted to it [40].
Physical computing :
Wiring : Borrows The Processing IDE for programming i/o boards [41] .
Arduino : As Wiring, Arduino shares the Processing programming environment so you won't have to learn another interface, “only” the code will be different [42].
Resources
Online
The syntax page [28] of the Processing web site is the most useful and obvious online help. It is really the starting point. If you encounter difficulties while developing beyond the syntax, other users can help you on the forum. To get a better chance of getting an answer, make sure to post in the right category (syntax, bug, openGl etc..). make sure to search the forum first see if anyone one encountered and resolved a similar issue. Be specific on what your problem is by posting code for instance, this will help you get a quick answer to your problem. There is no mailing list on the user end, the forum is the heart of Processing user contributed knowledge - it is a beginner friendly place to ask questions so don't be shy.
For clever code tricks look at processinghacks [45] and stellar snippet palace[46]. Make sure you also go through the excellent ”the nature of code” [47] class written by Daniel Shiffman to learn about “programming strategies and techniques behind computer simulations of natural systems”.
To keep in touch with what users individually think and produce, check processingblogs [48] - an aggregation of Processing related blog posts. Flick through the flickr [49] pool, and click around the meta sketchbook buildwithprocessing [50] for examples of interesting applets. Users also appropriately tag their videos so it's easy to find the ones related to Processing on YouTube [51] or Vimeo [52].
Offline
If you think Processing is for you and you will start creating things with it, then it's probably a good idea to purchase the recently published “Processing: A Programming Handbook” for Visual Designers and Artists [53], written by the very creators of processing Casey Reas and Ben Fry. At this date another book related to learning programming using Processing has been written: Processing: Creative Coding and Computational Art [53] By Ira Greenberg. I personally haven't yet been through those publications. I'll let you browse through the online samples to make up your own mind on what suits your needs best.
Limitations
The choice of the programming environment is a fundamental factor when starting working on a project. Hopefully this article will give you elements to answer this question. Nevertheless, Processing can be limited in some domains. First of all, Java isn't the fastest language around so if you need to process heavy computational tasks it will simply not deliver good results.
For instance, I would not recommend it to do real time sound synthesis. Not that it is impossible, but I would look at specifically designed environments that will provide you with more tools and speed to do so. Real time video manipulation is another treatment that demands lots of resources and if you wanted to access a large bank of clips or run heavy pixel manipulation on a video stream or between streams, probably best looking at some other means.
On a practical side, the IDE is very minimal and can become restrictive when writing lengthy code. It was made for sketches, so if you think about it like painting a fresco, then you might want to look at changing brushes. Eclipse can be used to write Processing code and will give you more flexibility when developing. A quick search on the forum will tell you how.
To end this chapter, something not only technically driven, but related to the whole recent Processing phenomenon and the future of the platform. Karsten Schmidt, a well respected programmer and Processing user, pointed out very pertinent comments about the dangers of having popular, easy to access programming resources within the creative world. The post he did on his blog [54] provoked substantial reactions within the community [55] and I would only encourage everyone serious about creating things with Processing to read through it. A post read 5000+ times can't be a bad post.
Thank you for reading this article. I sincerely hope it will help you in your artistic practice, and should you decide to use Processing, I can't wait to see what you will come up with.
Happy coding!
Notes
[1] Ben Fry : http://benfry.com/
[2] Casey Reas : http://reas.com/
[3] Aesthetic + computation group : http://acg.media.mit.edu/
[4] Wikipedia page about the MIT media lab : http://en.wikipedia.org/wiki/MIT_Media_Lab
[5] Design by Number (DBN) web site : http://dbn.media.mit.edu/
[6] John Maeda : http://plw.media.mit.edu/people/maeda/
[7] Processing Beta release announcement by Casey Reas http://processing.org/discourse/yabb_beta/YaBB.cgi?board=Collaboration;a...
[8] Processing official web site : http://processing.org/
[9] Processing forum : http://processing.org/discourse/yabb_beta/YaBB.cgi
[10] people behind processing : http://processing.org/people.html
[11] We feel fine, artistic approach to data visualisation onilne : http://www.wefeelfine.org
[12] Flight pattern by Aaron Koblin http://users.design.ucla.edu/~akoblin/work/faa/
[13] Complexification.net, Jared Tarbell's online gallery : http://complexification.net/
[14] Evolution zone, marius Watz's portfolio http://evolutionzone.com/
[15] Karsten Schmidt's (aka toxi) blog : http://www.toxi.co.uk/blog/
[16] Lovebyte generative identiy by Karsten Shmidt and universal everything
http://www.toxi.co.uk/blog/2007_04_01_archive.htm
[17] Nike one video by motion theory : http://www.motiontheory.com:16080/nikegolf/
[18] Magnetosphere iTune audio visualiser http://software.barbariangroup.com/magnetosphere/
[19] Flight 404, Robert Hodgin blog http://www.flight404.com/blog/
[20] Sonic wire Sculptor by Amit Pitaru : http://www.pitaru.com/sonicWireSculptor/framed/
[21] Philip Worthington's Shadow Monster project : http://www.worthersoriginal.com/viki/#page=shadowmonsters
[22] Processing download page http://processing.org/downlad
[23] IDE Wikipedia page : http://en.wikipedia.org/wiki/Integrated_development_environment
[24] setup reference page : http://processing.org/reference/setup_.html
[25] background reference page : http://processing.org/reference/background_.html
[26] draw reference page : http://processing.org/reference/draw_.html
[27] Cartesian coordinate system Wikipedia page : http://en.wikipedia.org/wiki/Cartesian_coordinate_system
[28] processing online reference : http://processing.org/reference/index.html
[29] processing online extended reference : http://processing.org/reference/index_ext.html
[30] class reference page : http://processing.org/reference/class.html
[31] Java comparison page : http://processing.org/reference/compare/java.html
[32] jikes web site
[33] Java.com
[34] Eclipse development platform : http://www.eclipse.org/
[35] Processing development web site : http://dev.processing.org/
[36] MaxLink library : http://jklabs.net/maxlink/
[37] JMyron library : http://webcamxtra.sourceforge.net/
[38] Processing libraries page http://processing.org/reference/libraries/index.html
[39] Hardware page (Arduino and Wiring) : http://hardware.processing.org/
[40] Processing mobile web site : http://mobile.processing.org/
[41] Wiring : http://www.wiring.org.co/
[42] Arduino : http://www.arduino.cc/
[45] Processing hacks : http://www.processinghacks.com/
[46] Stellar snippet palace : http://snippet.seltar.org/
[47] Daniel Shiffman nature of code http://www.shiffman.net/teaching/nature/
[48] Processingblogs : http://www.processingblogs.org/
[49] processing flickr pool : http://www.flickr.com/groups/processing/
[50] build with processing : http://builtwithprocessing.org/
[51] youtube processing group : http://youtube.com/group/processing
[52] Vimeo video tagged with processing : http://www.vimeo.com/tag:processing
[53] Processing related books : http://processing.org/learning/books/
[54] Toxi's rant : http://www.toxi.co.uk/blog/2006/01/note-this-article-is-using.htm
[55] Answer to toxi's comments: http://processing.org/discourse/yabb_beta/YaBB.cgi?board=Collaboration;a...
[56] Procedural programming Wikipedia page : http://en.wikipedia.org/wiki/Procedural_code
Images
[1] Jared Tarbell
Bubble chamber CC Attribution 2.0 Generic (http://creativecommons.org/licenses/by/2.0/deed.en_GB):
http://flickr.com/photos/generated/15448/
[2] Marius Watz
Object #1 (Attribution-Non-Commercial-Share Alike 2.0 Generic)
http://creativecommons.org/licenses/by-nc-sa/2.0/deed.en_GB
http://flickr.com/photos/watz/336839822/
[3] Av 06 - Sage Gateshead - Illuminations 01 (Attribution-Non-Commercial-Share Alike 2.0 Generic)
http://creativecommons.org/licenses/by-nc-sa/2.0/deed.en_GB
http://flickr.com/photos/watz/108738341/
[4] Karsten Schmidt
voxscape3 (Attribution-Non-Commercial-No Derivative Works 2.0 Generic)
http://creativecommons.org/licenses/by-nc-nd/2.0/deed.en_GB
http://flickr.com/photos/toxi/157372173/in/set-72157594145899116/
[5] We Feel Fine logo, image courtesy of Sep Kamvar
http://www.wefeelfine.org/
We Feel Fine copyright, All right reserved
[6] Screenshots of the IDE, images by the author