Blender: Working with 3D
Sumit Sarkar, May 2009
Once upon a time to work with 3d software you'd need a small fortune to get you started – a few thousand Euros for the software, and a few more to partake in a premium rate course or two to learn the basics. Or you could save your pennies and buy a mute tutorial book, which would invariably go out of date as newer versions of your program would surface, and keyboard short cuts, terminology and layout would change.
Now the world of 3D computer graphics has opened up and its anyone's game. Blender[1] potentially replaces the industry standards of Maya, Cinema4D and 3DS Max, happily quelling the age old dilemma of 'which 3D program is best / should I fork out on?' ('try Blender, its free and its great'). Your premium rate teacher is replaced by the hoards of helpful souls wandering Blender forums, waiting and eager to help, and to get you started you can search for the array of video tutorials on YouTube and beyond, lovingly created to make learning easy.
In the year and a half I have been learning and working with Blender, several new versions have already been programmed, further bridging the gap between open source and industry standard. And the world's knowledge of the program has equivalently improved. Ask a question and it is answered often in minutes. If the answer isn't known, you can bet your bottom dollar that the collective will be working out the answer. As such, any 3D task I've wanted to do, I've been able to.
Blender for Sculpture
The main reason for my foray into 3D work came from the need to create a series of sculptures, digitally designed, and physically made via rapid prototyping (RP) techniques[2].
I had initially looked into clay work, but I found the processes cumbersome, and nearly impossible to realise the detail, complexity and finish I was after. Thus the solution seemed to be to go digital with the 3D work, in the same way I moved away from analogue painting and design to digital with my 2D artwork, needing techniques infinitely more speedy, controllable and precise.
To be an artist, you now no longer need a studio space, expensive materials, tools and equipment - just a computer and an internet connection.
Work Flow
Your method of working will be down to you - indeed even for simple modelling, there are many ways to skin your cat. Some will want to prepare storyboards and sketches before embarking on a sculpture or animation, others dive in and follow trains of thought. Either way, it is the idea that drives the work, and that can come at any point in your project.
Interface
Many comment on the unusual interface of Blender, initially most noticeably in the way it uses a left click where most programs use a right. While you could change the settings so it is the opposite, I would recommend leaving it as is – once you get used to Blender's interface, it really feels very logical and intuitive. Indeed Blender has the most malleable interface of any program I have used – every window can be set to display the toolbar, panel or working area of your choice and you can even customise the overall look of the interface changing colours, sizing and fonts. Once you get used to Blender, you'll soon be wishing other programs followed its user friendly interface logic.
Edit Mode and Object Mode
I would highly recommend Apollos' finite Blender Basics video tutorials [3] as your first point of call. I have found following video tutorials the easiest and most successful way of learning. Watch, copy, rewind, repeat, master.
These will give you an insight into the two main modes you will use, Object and Edit Mode. Object mode allows you to work with all the objects in your scene, including such things as lamps and cameras. Click on an object and tab into Edit Mode and you'll then be able to work precisely on the individual object. There are too many vital Blender processes and their keyboard short cuts for it to be relevant to list just a few here – spend an hour or so with Apollos' tutorials and you'll know them all.
Having learnt the basics of Blender's Edit and Object Mode, you could pretty much make anything. If a sculpture can be seen as being a collection of co-ordinates that define its form, once you know how to create, move and join vertices (the individual points that make up your model), the only tricky bit becomes knowing what to make. Certainly patience and commitment are key attributes for any sculptor, digital or otherwise.
Modifiers are an important tool for modelling, and are equivalent to filters or effects in a 2D art application. Adding a modifier to an object applies that effect to the object, and can be removed, made invisible and modified without affecting the original mesh (the net form of all your connected vertices), You can add multiple modifiers to any given object. In many cases you will not need to apply your modifier at all but if you do make sure you do not apply it too soon, as this can result in meshes with a high number of vertices (which will push the power of your pc) and once applied you can't go back. For example adding a Subsurf modifier will make your object appear smooth from the few vertices of your mesh – apply it and it will make the modifier 'real', i.e. create enough vertices to ensure that smoothness (I always save my files with a different name every time I make a pivotal change so that there is 'going back').
A popular method for modelling is what is known as box modelling. Starting with Blender's default cube, subdividing it, adding a mirror modifier and a subsurf modifier, has you very quickly creating complete forms (subdividing adds extra vertices to your mesh, a mirror modifier means whatever you do on the left side is mirrored on the right, and the subsurf modifier adds extra subdivisions to each surface, making a few simple vertices appear curved and smooth.).
Add to this the extrusion (see image below) of vertices and faces (a face is made up of either 3 or 4 vertices) and you could easily make a humanoid form in 15 steps. This is the very essence of 3D modelling – starting with a simple form, adding more vertices to work with (e.g. by subdividing and extruding), and fine tuning.
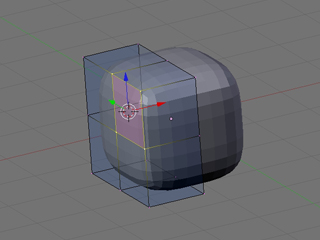
Subsurf and Mirror modifier
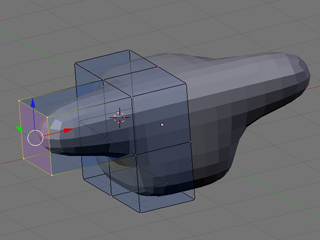
Extruding a face
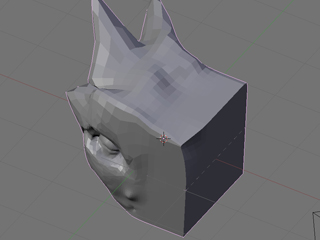
Alternatively, you can start your model from scratch, which is often the technique used for making human faces, or objects that aren't easily simplified into geometric shapes. Starting with a vertex, edge or face, extrude and reposition away until your form starts to take shape. Many people find it useful to use a background image as reference.
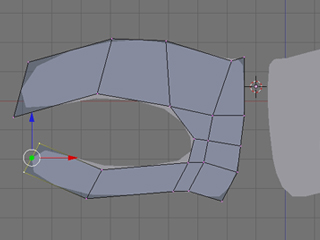
Modelling with extrusions
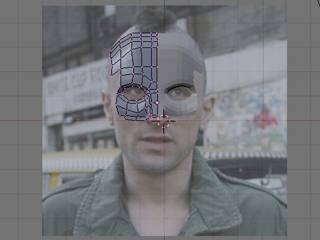
Using a background image as a guide
Sculpt Mode
Once you have your basic form, switch to Sculpt Mode for a more organic shaping of your mesh. All physical sculptural techniques exist here: You can Draw (which adds or 'rubs out'), Smooth, Pinch, Inflate, Grab, Layer and Flatten, all the tasks you could do with clay, without any of the imprecision or mess. You may need to subdivide an area so you can add further sculptural detail. Theoretically you could start with a cube, subdivide it to Hell, and create your model purely by sculpting it.
Sculpt Mode
It is also worthy of note that working in a virtual 3D environment that is essentially 2D from our physical point of view, it takes a bit of time to get used to the way the 3rd Dimension works, i.e. what is in / out, left / right being relative to the angle at which you're viewing the scene. With a bit of use, this quickly becomes instinctive.
Physical Output
As for outputting to physical form, Blender takes pride in its compatibility, so exporting in the correct format for rapid prototyping is a one click operation. MeshLab[4], another open source program, is also a useful tool for working with your .stl's (.stl is the file format commonly used for RP); finishing your meshes for output, sizing your object for the real world, checking for and cleaning up errors and generally seeing what your RP client will see.
One big issue I found when modelling for output was the trickiness in joining two meshes together. For example, if I wanted to merge a cone with a cube, (or a more complicated example being a hand with a sword), it is not merely enough to join the two objects, as all overlapping vertices would remain. For RP, the model needs to be one continuous outside net. Blender's Boolean[5] operation is intended for this, though is not quite yet up to scratch, especially when joining complex meshes together. As such I spent ages manually stitching overlapping meshes together, removing 'inside' vertices, when this could have been done in seconds by your RP client. Don't believe them if they say it will take many design hours to do this - it was only the very honest company I ended up working with that told me it is a one click, two second operation on their industry standard stl programs (which I'm sure MeshLab and Blender will be able to do before long).
I needed to work with a rapid prototyping company for my sculptures, though this is a very expensive process, the industry catering as it does for industry. However open source solutions are on the up, and that must surely be my next project. RepRap[6] and Fab@Home[7] are two such open source RP projects that are in development, designing machines so they can be made at home, and in case of the RepRap will even be able to self replicate. For the time being you can find your local Fab Lab[8] and use their machinery at relatively low costs, and even free in some cases. Manchester will soon see the UK's first Fab Lab.
It is encouraging that such things are becoming more affordable, and I've heard of 3D printers being introduced to schools and universities. Given a few years, I'm sure we'll all be able to create sculptures on our computers and 'print' them on our desk top 3D printer.
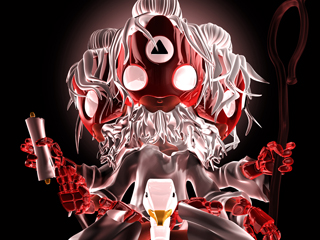
Screenshot of Blender Sculpt
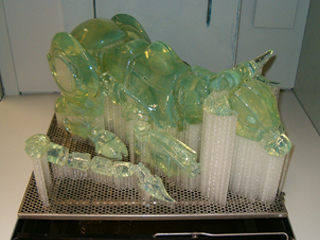
Photo of Rapid Prototyped model
Blender for Animation
Another main area in which I've used Blender to make artwork is for a series of animations. Modelling for animation is much the same as for sculpture with the main difference being the need to use as few vertices as possible to speed up rendering time. Working with quadrilateral faces (a face made up of 4 vertices) and avoiding triangles makes life easier (you'll see), and it soon becomes like a game, trying to make your model with as few vertices and triangles as possible.
So far you'll have modelled using three dimensions, X, Y and Z. Animation brings you to the fourth dimension: time. Place a ball at a certain point in your scene, and at a certain point on the timeline (the measure of time for your scene), say 0 seconds, set a key (a marker of an object in time), then move the ball's location and move forward in the timeline, say 4 seconds, set another key, and hey presto, you've animated. The ball will move between those two co-ordinates over 4 seconds.
Learning these basics means you can potentially make any animation you can conceive. Seemingly complicated scenes are purely down to detail and precision, i.e. the movement of a hand from A to B is one action, the movement of a hand with all of its fingers moving realistically is just many more equivalent actions for each section of each finger moving between two or more co-ordinates. Certainly patience and commitment are key attributes for any animator, digital or otherwise.
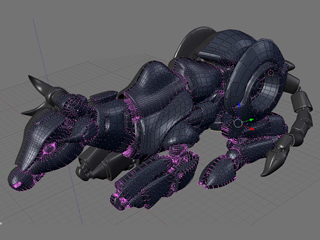
Get more into Blender use and you'll soon be rigging your character with sets of actions and constraints, so that by moving one object, the whole hand will clench into a fist, or spread its fingers.
Blender's physics engine is another gratifying and hugely useful tool for creating dynamic animations. A few clicks here and a value entered there, and the hair and clothes of your character will react to gravity, wind and movement, and bellies will bounce. Google or YouTube-search softbody and cloth, and you're really half way there.
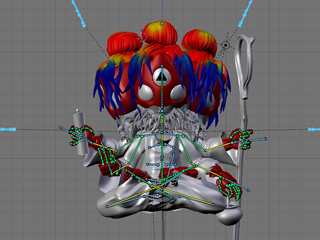
Rigging model for animation
Render of animation
Blender Live
I've also used Blender for live work, that is, creating 3D artwork at clubs or art events [9]. With a computer and a projector and a confident knowledge of all of the above, it is more than possible to create a virtual sculpture in a few hours. It is captivating for an audience to see a blank 'canvas' evolve into a 3D form, more so than the 2D equivalent live work I used to do, and the ease of Blender's interface makes the process fluid and highly watchable.
Rendering
Finally, adding lighting, colour and texture to your scenes is the fun part, and again the only limits to what can be achieved are those of your imagination.
In the vein of such CGI films as The Incredibles and Monsters Inc, there are a growing number of films made entirely in Blender [10], most famously Elephants Dream, proving Blender (that's you), can do anything the industry standards can. This bodes interesting questions for the future – as personal computers get more powerful, and newer versions of Blender and other open source programs are released year after year, given ten, and a great idea, aren't we all then on the same playing field as Hollywood and multi million Euro budgets?

Still from Elephants Dream
Notes
[1] http://www.blender.org/
[2] http://en.wikipedia.org/wiki/Rapid_prototyping
[3] http://blenderunderground.com/2007/07/18/blender-basics-part-1-video-tut...
[4] http://meshlab.sourceforge.net/
[5] Boolean operations are AND, OR or NOT, or in Blender terms, Union, Intersect and Difference, i.e. You can join two objects as one, work out the area they intersect, or the area they don't, very useful processes in Rapid Prototyping
[6] http://reprap.org/bin/view/Main/WebHome
[7] http://www.fabathome.org/
[8] The Fab Lab program started at MIT's Center for Bits and Atoms (CBA) and spread from inner-city Boston to rural India, from South Africa to the North of Norway. Fab Labs provide widespread access to modern means for invention, and share core capabilities, so that people and projects can be shared across them. http://en.wikipedia.org/wiki/Fab_lab
[9] Live 3D work recorded http://www.youtube.com/kriksix
[10] It's open source so it's all free. Download at http://www.blender.org/features-gallery/movies/
Images
[0-9] by the author
[10] (c) copyright 2006, Blender Foundation, Netherlands Media Art Institute, http://www.elephantsdream.org

